
Sunday, March 31, 2013
Game of Thrones Season 3 Premiere Nails
Happy Easter everyone! I did some nails for the occasion, but I'll show you them later because right now my mind is being consumed by thoughts of Game of Thrones! I'm going to celebrate Easter tonight so I'll have to watch the premiere a bit late, but I'm still oh so excited!!
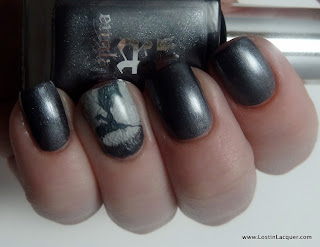
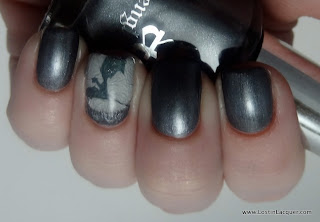 The metallic dark gray is A England King Arthur. The accent nail is the season 3 logo for Game of Thrones, the shadow of a flying dragon. For this, I painted my nail white with OPI My Boyfriend Scales Walls and then I used the homemade decal method. Once the decal was on, I used King Arthur and a small brush to add the ruffian.
 Above is the logo, and below is the outfit I'm sporting for the occasion. So stoked!
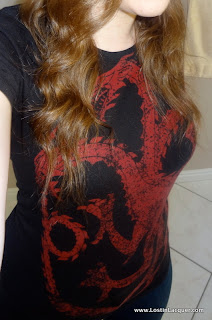 Are any of you planning on watching the premiere tonight? Do any fun Game of Thrones nail art? Thanks for reading, and don't forget to enter the OPI DS Sapphire Giveaway running until April 10th, 12:00 am EST!

Labels: A England, Game of Thrones, Homemade Decals
Friday, March 29, 2013
New 31 Day Challenge - Day 7 - X-Note Anon Skittle Manicure
Hey everyone! I wanted to do an ombre for today's challenge, but I completely forgot that I was supposed to do a challenge post today. Fortunately, I did an unrelated skittle manicure that I can post in its place. This manicure is based off of a character from another video game I love called X-Note. I'll start with the nail art and post about the game afterwards for those of you who interested. By all means, feel free to skip my off-topic ramblings.
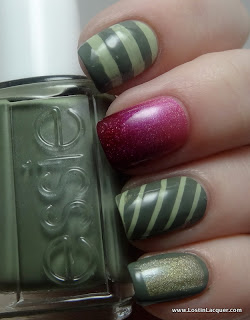
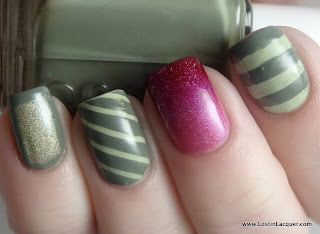
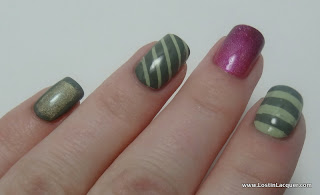
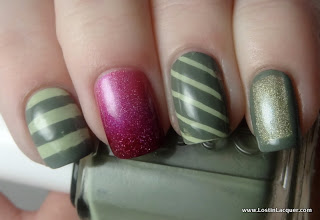
The light green is Butter London Bossy Boots. The holographic light green on the pinky is Butter London Trustafarian. The darker green is Essie Power Clutch, and the two polishes on the middle finger are Catherine Arley 804 and Zoya Blaze. I used a make up sponge to gradient Blaze over 804, and striping tape to paint Power Clutch over Bossy Boots. For the pinky, I used a small brush to paint on the outline. I've been warned to paint the inside last instead of the outside, but I didn't listen. I probably should have. Oh well, I still love it!
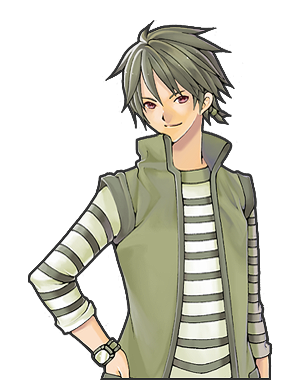
 Now about the inspiration! In X-Note, you play as a teenage girl named Essi. Essi lives on her own because her mother died in an accident ten years ago. She was left with a necklace containing a USB drive with a single file called "X-Note," the contents of which she has been unable to access. When you first begin playing, Essi is approached by a young man named Yuon who asks for her help in investigating a series of murders that have been happening at his school. The reason he asks for Essi's help in particular is two-fold. One, she is psychic and can use those powers for investigating. Secondly, the school is tied to Essi's deceased mother. The game is mystery/otome, meaning you investigate the mystery while also pursuing your choice of the game's male leads. For those of you who are interested, you can play a free demo of the game here. My favorite male character was Anon, who is the basis for this manicure.
Thanks for reading, and be sure to check out the gorgeous nails of the wonderful ladies participating in this challenge along with me!
The light green is Butter London Bossy Boots. The holographic light green on the pinky is Butter London Trustafarian. The darker green is Essie Power Clutch, and the two polishes on the middle finger are Catherine Arley 804 and Zoya Blaze. I used a make up sponge to gradient Blaze over 804, and striping tape to paint Power Clutch over Bossy Boots. For the pinky, I used a small brush to paint on the outline. I've been warned to paint the inside last instead of the outside, but I didn't listen. I probably should have. Oh well, I still love it!


Thanks for reading, and be sure to check out the gorgeous nails of the wonderful ladies participating in this challenge along with me!
Jayne at Cosmetic Proof
Traci at Drink Citra
Naomi at Bellezza Bee
Don't forget to enter the OPI DS Sapphire Giveaway running until April 10th, 12:00 am EST!
Labels: Butter London, Catherine Arley, Essie, Green, Video Games, Zoya
Thursday, March 28, 2013
China Glaze Hologlam Comparison
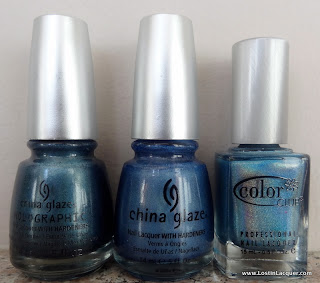
Hey everyone! A few days ago I got my hands on a few China Glaze Hologlam polishes. When I saw swatches of them online, I was curious to know how holo they were in comparison to the Color Club Halo Hues and polishes from the old OMG collection. Unable to find such a comparison, I set out to do it myself. I hope this aids you in your polish purchasing decisions. For each polish, I used one coat of regular base coat, two coats of polish, and then a fast dry top coat.
Index - China Glaze Hologlam Take a Trek
Middle - China Glaze OMG 2NITE
Ring - China Glaze Hologlam Take a Trek
Pinky - Color Club Halo Hues Over the Moon
As you can see, Take a Trek is significantly less holographic than 2NITE. You can also see that the holographic particles in the Color Club Halo Hues are a lot larger than they are in the China Glaze holographics. In terms of formula, Color Club takes the prize. Take a Trek had the worst formula and is quite streaky.
If you're looking for in your face rainbow goodness, grab the Halo Hues. They're cheaper, more holographic, and a lot easier to apply. If you're looking for a more subtle holo, I'd search around ebay for some OMGs. I've purchased all of mine there for $15 or less, and since the Hologlams retail for $14 (seriously China Glaze?), you might as well get the better ones.
Thanks for reading, and don't forget to enter the OPI DS Sapphire Giveaway running until April 10th, 12:00 am EST!
From left to right: China Glaze Hologlam Take a Trek, China Glaze OMG 2NITE, Color Club Halo Hues Over the Moon. Over the Moon is definitely the most holographic of the three, which can be seen in the bottle shot.
| Sunlight |
| Flash |
| Flash |
Middle - China Glaze OMG 2NITE
Ring - China Glaze Hologlam Take a Trek
Pinky - Color Club Halo Hues Over the Moon
As you can see, Take a Trek is significantly less holographic than 2NITE. You can also see that the holographic particles in the Color Club Halo Hues are a lot larger than they are in the China Glaze holographics. In terms of formula, Color Club takes the prize. Take a Trek had the worst formula and is quite streaky.
If you're looking for in your face rainbow goodness, grab the Halo Hues. They're cheaper, more holographic, and a lot easier to apply. If you're looking for a more subtle holo, I'd search around ebay for some OMGs. I've purchased all of mine there for $15 or less, and since the Hologlams retail for $14 (seriously China Glaze?), you might as well get the better ones.
Thanks for reading, and don't forget to enter the OPI DS Sapphire Giveaway running until April 10th, 12:00 am EST!
Labels: Blue, China Glaze, Color Club, Holographic
Wednesday, March 27, 2013
OPI DS Sapphire and 100 Followers Giveaway!
Hey everyone! As someone who is new to the polish world, I wasn't collecting at a time when OPI had holographic nail polishes. Every night, dreams of old Designer Series polishes fill my head...not really, but I have been wanting one of my own! But for $20+ a bottle, I never purchased any. One day, Raine and I were wandering through a beauty supply shop where we saw several bottles of OPI DS Sapphire for sale. The shop must have forgotten to sell them back in 2006, but there they were in the flesh. I'm sure you can guess how the story ends.
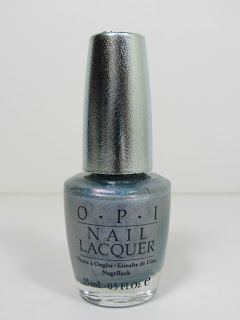 Did you figure that I bought one for myself and one to give away to my lovely readers? Then you are correct! It's hard to believe that I have been blogging for nearly three months already. I had known for a while that I wanted to start a blog, but what I didn't know is how much fun it would be. In such a short amount of time, I've already made some wonderful new friends. Seriously, you ladies are the best! <3 To commemorate triple digit followers(!!!), I will be giving away one 15mL bottle of OPI DS Sapphire. It is brand new and even comes in a fancy little box! To enter, use the Rafflecopter widget below. You MUST follow Lost in Lacquer via GFC or Bloglovin' to enter this giveaway. Any e-mail only entries will be DELETED.
a Rafflecopter giveaway
This giveaway is in no way sponsored, endorsed or administered by, or associated with OPI, Facebook, or Twitter. We hereby release these groups of any liability. If you have any additional questions - feel free to contact me at [email protected].
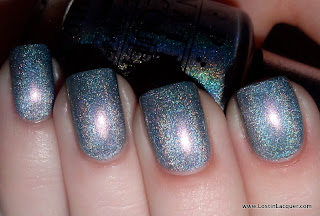
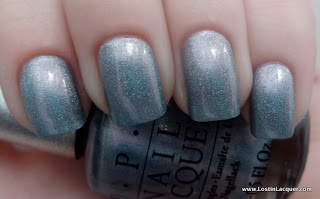 And here are some swatches with flash and in the shade! OPI DS Sapphire. Three coats. This is a light blue holographic with a slight color shift to purple. The formula is good. A bit on the sheer side, but it's easy to build it up to opacity.
Thanks for reading and good luck!
a Rafflecopter giveaway
- This giveaway runs from March 27, 2013 to April 10, 2013, 12:00 a.m. EST.
- If you are under 18, make sure you have parental consent. I will need your address to ship the prize.
- The winner will be contacted by email within 48 hours after the giveaway ends. Winners will have 48 hours to respond before a new winner is chosen.
- Winner(s) will be selected randomly using Rafflecopter.
- This giveaway is open to U.S. and U.K. residents only. For those of you who live in the U.K., I will be offering an alternate prize of one A England polish of your choice. (Sorry, I haven't figured out international shipping as of yet).
This giveaway is in no way sponsored, endorsed or administered by, or associated with OPI, Facebook, or Twitter. We hereby release these groups of any liability. If you have any additional questions - feel free to contact me at [email protected].
Thanks for reading and good luck!
Tuesday, March 26, 2013
New 31 Day Challenge - Day 6 - Favorite Color Family
Hey everyone! Blue is my favorite color, and I especially love different shades of teal. I hope it's not blasphemous for me to include white in this manicure, but I needed a contrasty base for the dots!
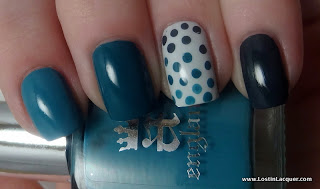
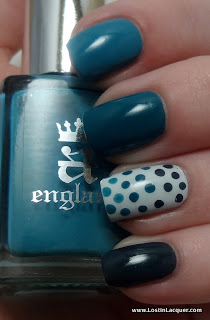
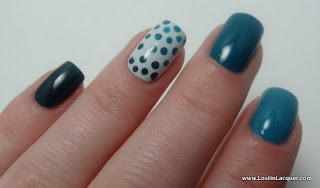 From lightest to darkest, the three shades of teal I used are A England Galahad, Illamsqua Muse, and Butter London Stag Do. For the accent nail, I painted my nails with OPI My Boyfriend Scales Walls and then randomly added dots using a dotting tool and the three shades of teal. I changed the teal I used as I went further up the nail, from darkest to lightest. I decided that from now on, I'm going to take and edit my photos this way. I think it looks a lot better and emphasizes the nail art more. (It also means I don't have to take nearly as many photos). Though I do need some brighter lighting!
Thanks for reading, and be sure to check out the gorgeous nails of the wonderful ladies participating in this challenge along with me!
Thanks for reading, and be sure to check out the gorgeous nails of the wonderful ladies participating in this challenge along with me!
Jayne at Cosmetic Proof
Traci at Drink Citra
Naomi at Bellezza Bee
Labels: A England, Blue, Butter London, Illamasqua, OPI
Monday, March 25, 2013
Hakuouki Nails - Souji Okita Edition
Hey everyone! Today's post is going to be a bit off-topic, but I promise there is still nail art at the end. As many of you well know, I love video games. I've been playing them since I was 7 years old, and I've never stopped. A lot of people have the impression that "real" (non casual like wii sports) video games are made for children and teens, but the fact of the matter is, suitable video games exist for all ages. Similarly to how there are multiple varieties of movies and books, the same phenomenon exists in video games. In short, video gaming can be whatever you want it to be. You can shoot up a bunch of aliens a la the Halo franchise, or like me, you may prefer story driven games such as visual novels. Visual novels are a branch of video games that are a lot like choose your own adventure books. The game mostly involves reading large amounts of text and then making choices about where to go, what to do, what to say, etc. Essentially, you're playing an interactive novel. Depending on the choices you make throughout the game, you obtain different events and endings. Along with the text, you'll find music, character portraits/animations, illustrated settings, and sometimes even voice acting for the dialogue. Visual novels also come in a whole slew of genres. You can go sci-fi, mystery, romance, or a combination of those three and many more.
Now that I've got that explanation out of the way, around the same time last year that I started painting nails I also discovered otome games. Otome games are (usually) a kind of visual novel where you play as a girl. Aside from the main story, there are also romantic elements, mainly in the form of many potential suitors that correspond with different story endings. Very few of these games exist in the North American market, as female gamers are underrepresented in the industry. Lately though, I've discovered a few entries that have re-ignited my love for the genre. And that brings me back to the very first otome game I played, Hakuouki. In Hakuouki, you play as a girl who is in search of her father. While searching for her father, she witnesses a fight between shinsengumi (a special type of police active during the late shogunate period), and is eventually taken in by a group of the shinesengumi once they figure out that they are also looking for her father. I won't go into too much detail, but the story chronicles the fall of the shinesengumi era (and you can also romance one of the very fine looking captains).
As I mentioned before, this game was released in North America at the same time I was getting into nail art. I stumbled upon some photos of nail art done in the Japanese Akihabara Salon. This particular salon caters to the need of anime lovers, and offers Hakuouki themed manicures! At the time, I was determined to re-create these looks, but my nails came out pretty horribly due to my inexperience. So today I'd like to share with you my second attempt!
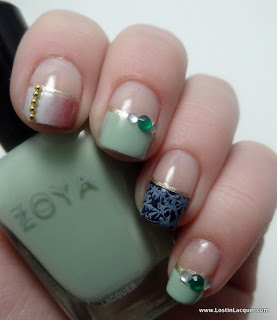
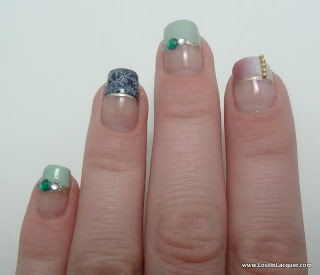 First, I used one coat of Julep Oxygen Treatment as the base. I'm not sure what the treatment is supposed to do, but I like using this as a base coat for manicures where I'll be showing my natural nails because the slight pink tint makes my nail beds look so much nicer. The gold lines were added using tape and Orly Lux. For the middle and pinky fingers, I added Zoya Neely on top of the gold and added green and white gems along the side. For the ring finger, I added Julep Michelle and then stamped over it with BM-204 and Butter London Billy No Mates. Finally for the index finger, I used China Glaze TTYL and gradiented on OPI My Boyfriend Scales Walls. To finish it off, I cut a little bit of a gold bead chain and affixed it to my nail using top coat.
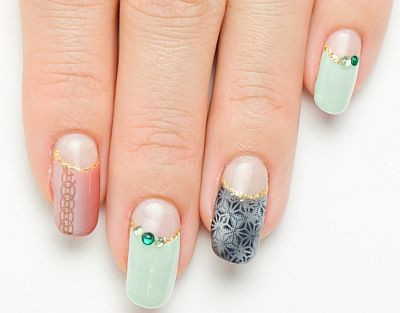 And here are the nails that I modeled mine after. I tried to add the cool design on the index finger, but mine just came out so messy that I settled for a gold chain instead. Mine isn't perfect, but considering this manicure costs 12,800 yen ($154) to have done, I'm quite happy with my free at-home version.
 And here's the character that the nail art is based off of, Souji Okita. You can see where the colors and patterns came from, it's kind of neat. I think I'll be trying more of these in the future, it's a lot of fun to wear your fandom! Thanks for reading!
Now that I've got that explanation out of the way, around the same time last year that I started painting nails I also discovered otome games. Otome games are (usually) a kind of visual novel where you play as a girl. Aside from the main story, there are also romantic elements, mainly in the form of many potential suitors that correspond with different story endings. Very few of these games exist in the North American market, as female gamers are underrepresented in the industry. Lately though, I've discovered a few entries that have re-ignited my love for the genre. And that brings me back to the very first otome game I played, Hakuouki. In Hakuouki, you play as a girl who is in search of her father. While searching for her father, she witnesses a fight between shinsengumi (a special type of police active during the late shogunate period), and is eventually taken in by a group of the shinesengumi once they figure out that they are also looking for her father. I won't go into too much detail, but the story chronicles the fall of the shinesengumi era (and you can also romance one of the very fine looking captains).
As I mentioned before, this game was released in North America at the same time I was getting into nail art. I stumbled upon some photos of nail art done in the Japanese Akihabara Salon. This particular salon caters to the need of anime lovers, and offers Hakuouki themed manicures! At the time, I was determined to re-create these looks, but my nails came out pretty horribly due to my inexperience. So today I'd like to share with you my second attempt!


Labels: Butter London, China Glaze, Julep, OPI, Orly, Stamping, Video Games, Zoya
Sunday, March 24, 2013
Disney by Sephora Jasmine Collection "One is Never Enough" Nail Set Swatches and Review
Phew, what a wordy title! Today I'm going to show you the new Sephora by OPI mini polishes that are included in the One Is Never Enough limited edition nail polish collection. This is the second installment of the Disney by Sephora collection. The first collection centered around Cinderella and this one focuses on Princess Jasmine from the Aladdin series. I am such a sucker for the packaging of these products, they're so lovely. For both collections, I have limited myself to just the nail polishes because they're the only beauty products I'm guaranteed to use with any regularity.
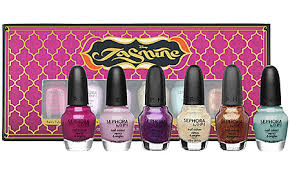
The One is Never Enough set includes six miniature (~3.7mL) nail polishes for $24.50. That's a little over 4 dollars for each miniature bottle, and $1.10 per mL of polish. For comparison, a regular Sephora by OPI bottle is $9.50 for a 15 mL bottle, which is around $0.63 per mL. In other words, the price increase for these polishes is pretty steep, so keep that in mind. All of these swatch pictures were taken in a lightbox.
This set comes with some great colors and even greater formulas. However, they are quite pricey for the amount that you get. Also, if you have a sizeable nail polish collection, you likely have a dupe for many (if not all) of the colors. As a person who doesn't care for Disney movies or Disney princesses or anything of the like, this collection holds no sentimental value for me. But, I would recommend this set for anyone who is a fan of Disney (and/or Jasmine in particular) because the set is really cute and you are getting a nice product. I would also recommend this set for those with small polish collections who are looking to add a few more gorgeous colors to their collections.
If you'd like to get a set of your own, head over to your local Sephora store. Otherwise, you can get them online at Sephora's website. Thanks for reading!
Labels: Review, Sephora by OPI
Saturday, March 23, 2013
New 31 Day Challenge - Day 5 - Purple Watercolor Nails
Hey everyone! Today's challenge calls for purple nails and I've been wanting to try watercolor nails, so I combined the two to create this manicure. I used this tutorial for this manicure. Next time I try watercolor nails, I'm going to do it the more standard way (with nail polish and acetone). That way I would have a lot more colors to choose from!
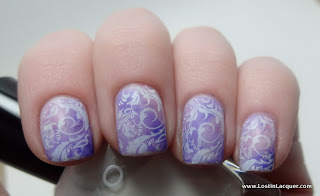
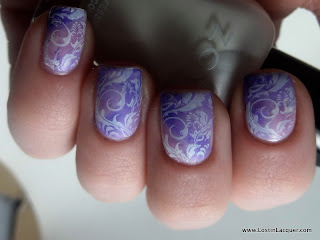
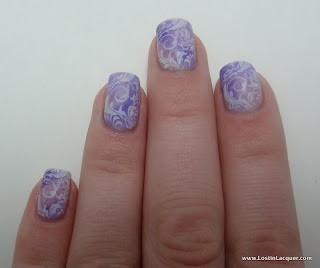 First, I used three coats of Zoya Christinna. Christinna is a lovely pearly white polish. After that, I used three different purple acrylic paints mixed with water in random spots on my nail. I went over those spots three times to get the colors opaque. Once that was done, I used a matte top coat. I wasn't entirely happy with how plain the manicure looked, so I added a design from BM-21 with Konad Special Polish in White.
Thanks for reading, and be sure to check out the gorgeous nails of the wonderful ladies participating in this challenge along with me!
Thanks for reading, and be sure to check out the gorgeous nails of the wonderful ladies participating in this challenge along with me!
Jayne at Cosmetic Proof
Traci at Drink Citra
Naomi at Bellezza Bee
Thursday, March 21, 2013
Blue and White Porcelain Nails
Hey everyone! I've always been a fan of the blue and white porcelain style. I'm not sure if it has a specific name (my limited google search yielded no name), but if you happen to know it please fill me in! A few days back, my mother brought out a porcelain blue and and white tea tray and I was inspired to do this manicure. The tray she brought out had three shades on it: white, light blue, and a darker blue. I wanted to recreate this tri-toned porcelain look. Originally, I intended on sponging on bits of light blue, but instead I modified my stamping method to add small outlines of light blue.

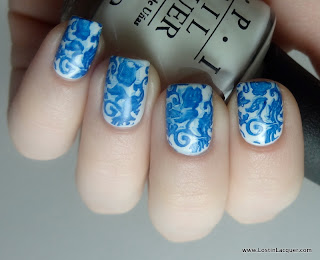 I used OPI My Boyfriend Scales Walls for the white base. Then, I used the RA-112 stamping plate with Deborah Lippmann My Prerogative. Here's where I modified my method of stamping a bit. Instead of using the scraper at an angle, I held it straight when scraping off the excess polish on the stamping plate. This way, a little bit of the excess polish stayed on the plate, making light blue stains appear near the dark blue stamping. Let me know if that explanation doesn't make sense, I can post pictures to clarify. I finished it all of with some shiny top coat (INM Out the Door).
If you're interested in the stamping plate I used here, they're the Red Angel stamping plates, and you can find them here on Amazon. Thanks for reading!
If you're interested in the stamping plate I used here, they're the Red Angel stamping plates, and you can find them here on Amazon. Thanks for reading!
Labels: Blue, Deborah Lippmann, Sephora by OPI, Stamping, White
Wednesday, March 20, 2013
New 31 Day Challenge - Day 4 - Pink
Hey everyone! I'm going to keep today's post short because I've got family in town. For today's manicure, I'm using the pink manicure that I accidentally did when I was supposed to do gold nails. I thought I'd use some glitter for this challenge since I rarely every use any.
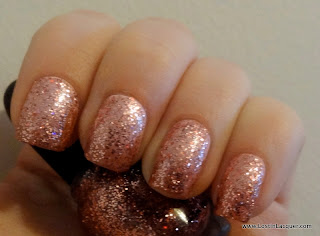
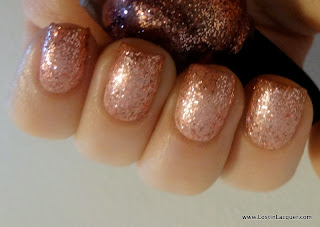 The lighting is dim, but it was the only lighting that actually captured what this manicure looked like in real life! It feels like I'm wearing some sequined fabric on my nails. The glitter is Sephora by OPI Bibbidi, Bobbidi, Pink!, which is one of about 10 glitters I own. I probably need to expand my glitter collection, but I just prefer to wear creams and shimmers. The pink underneath is a gradient of Butter London Teddy Girl and China Glaze TTYL. You can hardly see it, but the tips of the nails are a darker pink than the nail bed.
Thanks for reading, and be sure to check out the gorgeous nails of the wonderful ladies participating in this challenge along with me!
Thanks for reading, and be sure to check out the gorgeous nails of the wonderful ladies participating in this challenge along with me!
Jayne at Cosmetic Proof
Traci at Drink Citra
Naomi at Bellezza Bee
Labels: Butter London, China Glaze, Gradient, Sephora by OPI
Tuesday, March 19, 2013
New Hard Candy Polish Swatches and Review
Hey everyone! A few weeks back, Walmart started stocking the new line of Hard Candy polishes. I picked up a couple of colors to share with all of you. These polishes retail for $3.97 and come in 45 different colors. I wish I could show you all 45, but I hope these two will suffice. I'm wearing a ridge filling base coat and one layer of top coat in these swatches.
Hard Candy 633 Little Hottie. Two coats. In the bottle, this shade appears to be a bright pink, red and gold multichrome shimmer. However, on the nail it looks like a very bright red hot pink shimmer. You can see a little bit of the gold if you close up on the shade picture, but not that much. It was a little disappointing, but still pretty! The formula was good, a bit streaky on the first coat, but it evened out by the second.
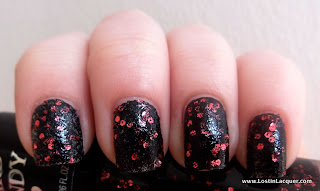 Hard Candy 655 Masquerade. Three coats except on ring finger, which has two coats over black polish. I only included one photo because it pretty much looks the same in both the shade and sunlight. I really didn't like this one. In the bottle it appears to have a black base with red hex glitter, but it's actually more of a clear base that's tinted black from having a ton of black microglitters. The formula was thick and gloopy and didn't have very good coverage, especially towards the tip of the nail. The microglitters do give it this really cool texture though, almost like leather.
Removal was easy for Little Hottie, but Masquerade gave me a bit of trouble as glitter generally does. Have you tried any of the new Hard Candy polishes? Thanks for reading!
| Sunlight |
| Shade |
Removal was easy for Little Hottie, but Masquerade gave me a bit of trouble as glitter generally does. Have you tried any of the new Hard Candy polishes? Thanks for reading!
Labels: Hard Candy, Review
Sunday, March 17, 2013
New 31 Day Challenge - Day 3 - Gold
Hey everyone! For whatever reason, when I was looking at the schedule for the challenge, I thought today's challenge was for pink. I had my pink manicure ready to go this morning...only to realize that I was supposed to do a gold manicure. Oops. Then I found out that a new Hakuoki game came out (if anyone knows what I'm talking about I will cry tears of joy); I had to get that ASAP. So, here's something I quickly put together for today's challenge. Unfortunately, they all smeared other than the index finger. I'll try to better next time! Today I learned that I have eight different shades of gold foil polish...Sometimes I think I need to de-stash. I used four of the gold polishes for this manicure.
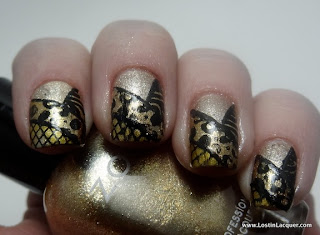
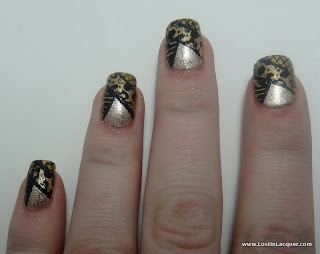 I don't even know what I was going for with this manicure. The lightest gold is Sephora by OPI Self-Maid Millionaire. From there, we have Catherine Arley 807 on the side, Zoya Ziv with the leopard print, and A England Holy Grail (Old Version) with the lace at the tip. The side design is from BM-19, and the lace and leopard print are from the Konad m57 plate. I used tape to keep the stamps in their intended sections, and finished it off by using a black glittery striper.
Thanks for reading, and be sure to check out the gorgeous nails of the wonderful ladies participating in this challenge along with me!
Thanks for reading, and be sure to check out the gorgeous nails of the wonderful ladies participating in this challenge along with me!
Jayne at Cosmetic Proof
Traci at Drink Citra
Naomi at Bellezza Bee
Labels: A England, Catherine Arley, Sephora by OPI, Stamping, Zoya
Saturday, March 16, 2013
Nude Nail Art
Hey everyone! Can you believe I'm still sick? That didn't stop me from making more nail polish and painting my nails, though. I used the colors from yesterday's Butter London Starkers swatches to do some nail art. I FINALLY got over my fear of making dots using a dotting tool. I know that sounds silly, but I've never actually used the dotting tool for its intended purpose.
This gradient's base is Butter London Shandy. I then used a sponge to apply a gradient of Butter London Crumpet, Butter London Tea & Toast, and Shandy. For the accent nail, I used Shandy as a base and then dotted Crumpet on the bottom half of the nail and Tea & Toast on the top half using a dotting tool. The dots actually look alright! Maybe next time I'll venture out and put dots on multiple nails.
By the way, the drink "Shandy" (a mix of Sprite and beer) that I mentioned last night is confirmed disgusting. I had my boyfriend make one and he told me it tasted like stale soda. Mmm...Thanks for reading!
Labels: Butter London, Gradient
Friday, March 15, 2013
Butter London Starkers Collection Swatches and Review
Hey everyone! So far, I'm two polishes into my first collection. That's why this post is so late...it's hard to swatch when you're constantly getting sidetracked by making shinies! Today I've swatched the three new nude shades that Butter London released this spring alongside their Spring 2013 collection.
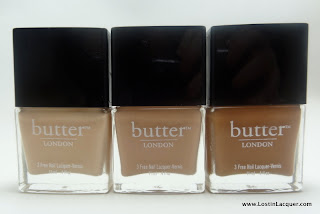 These three colors are likely meant to compliment different skin tones, but I'm going to wear them all anyway. For all of the swatches below, I've used two coats of polish and one coat of top coat.
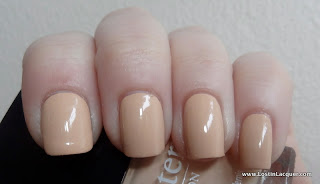 Butter London Shandy. This is the lightest of three nudes. This would give a normal pale person mannequin hands. However, I happen to be the most pale kind of pale possible, so it leans somewhat peach-colored on my skin. The formula on this was wonderful. Opaque, self-evening, easy to apply. No complaints. Fun fact, Shandy is the named after a drink that is a mix of Sprite and beer...am I the only one that thinks that sounds awful?
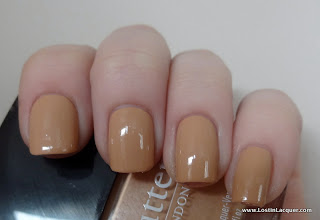 Butter London Crumpet. This one is a few shades lighter than Tea & Toast, but definitely similar. It has the same great formula as Shandy.
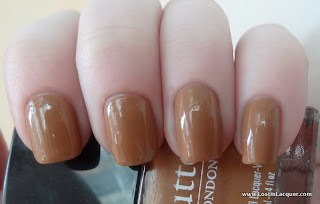 Butter London Tea & Toast. This is the darkest of the three shades. It's the exact color of caramel. Staring at it makes me kind of hungry... I hate to sound like a broken record, but this one is just like the other three; absolutely wonderful to paint with.
Overall, I really love these! I would definitely recommend them if you're looking for a nude polish, as they basically apply themselves. Also if you haven't gone to Ulta yet, they're having a sale on Butter London! $9 a bottle instead of the usual $15. Thanks for reading!
Overall, I really love these! I would definitely recommend them if you're looking for a nude polish, as they basically apply themselves. Also if you haven't gone to Ulta yet, they're having a sale on Butter London! $9 a bottle instead of the usual $15. Thanks for reading!
Labels: Butter London, Review
Subscribe to: Posts (Atom)
