Thursday, June 27, 2013

An Update On Life + Glitter Fail

Hey everyone! Sorry for not posting for a while. As I'm typing, I'm still in New Jersey and won't be home until Saturday. I'm happy to say that I've found a place to live in the fall though! My boyfriend and I found an apartment that's (relatively) inexpensive and only two miles away from campus. I'm pretty stoked about it, that's at least one less thing to worry about...

On a nail art related note, I did these nails after posting my Cirque Arcus Holographic swatches. I'm not sure what compelled me to gravitate to this crazy glitter manicure, but I'd figure I'd share it with you while I'm away and unable to paint my nails. 
I'm trying to remember what exactly I used...but I know the base is Cirque Bejeweled. The index finger was dipped in jar of silver glitter and then top coated. The middle finger has a glitter gradient of  OPI Excuse Moi. The ring finger has a Kiss Nail Dress in Peignoir on top, and the pinky is just Bejeweled on its own. I think the pinky nail is my favorite. ;)

Thanks for reading!

Saturday, June 22, 2013

bigRuby Nail Tattoos Review

Hey everyone! I'm finally going to New Jersey tomorrow morning to find a place to live...hopefully my flight doesn't get cancelled again at 3 am! Today I've got a real cool nail art product to show you. Maria over at bigRuby sent me a few different tattoos to review and I used them for two manicures, one of which I will be showing you today.
I used the Henna pack photographed above for this manicure. This pack comes with two sheets containing 86 tattoos. I absolutely love all of these designs, I had the hardest time choosing which ones to use! For those of you who aren't familiar with nail tattoos, they work the same way as regular temporary tattoos. You cut out the design you want, place it where you want on your dry painted or unpainted nail (there's an outline on the back of the paper that makes placing the tattoo a breeze), and then wet it for 15 seconds and peel the paper off. It's that simple! To seal the design, use two coats of top coat.
I used the nail tattoo over three coats of Butter London Fishwife. Isn't that peacock just the cutest? I love it! The process of applying the tattoo is so easy, and application is just about flawless. The only real issue I had was some of the tattoo not completely adhering to my nail, as you can see in this macro shot below. 
A little part of the wing and bottom of the bird didn't adhere to my nail, but I am about 99% sure that was user error and not necessarily the fault of the tattoos. Plus, it's really hard to see in person so it's hardly even worth mentioning.

Overall, I really love these tattoos. They're absolutely gorgeous and very user friendly. I would especially recommend these as an alternative for people who struggle with stamping, or for those who like to use nail stickers. But really, I'd recommend them for everyone! In addition to making awesome sets of nail tattoos, bigRuby is also a cruelty-free company that donates a portion of proceeds to The Kindness Ranch, World Vets, the ASPCA, and several other organizations that care for animals. Pretty nails that help support a good cause? Count me in! Please be sure to check out bigRuby if you want to get your hands on some of these. The Henna set retails for $12. Thanks for reading!

*The nail tattoos were sent for review. To see my disclosure policy, please click here.

Thursday, June 20, 2013

Julep Bess Nail Art

Hey everyone! I haven't posted for a while, and this is mainly due to the release of Animal Crossing (I'm a wee bit obsessed) and my lost clean up brush. I'm quite the messy nail painter, so this thing is somewhat of a necessity for me. I still haven't found it, so please don't mind the messy cuticle area... ^^' Throw in a broken nail and lack of inspiration, and you've got the perfect storm for lazy nail painting. But here's something to get me through this polish funk...
I started off with two coats of OPI My Boyfriend Scales Walls. I added Julep Bess, an egg-shell blue creme using the make-up sponge gradient technique. The look is complete with a design from PUEEN21 and Konad Special Polish in Silver. The blue is coming out a lot brighter than it actually it is...it's bit more muted and just gorgeous. A bit on the sheer side though, which made it a bit of a challenge to gradient with.

Thanks for reading! Hope you all are having a lovely week! 

Sunday, June 16, 2013

Liquid Sky Lacquer Wines & Roses

Hey everyone! I was planning on showing you two polishes today, but I'm only going to show you one because these proved a challenge to photograph! This is Liquid Sky Lacquer Wine & Roses. Wine & Roses is a plum and pink thermal holographic polish. When it's cold, the polish is a dark brownish plum color. In the heat, the polish turns a light salmon toned pink. I am in love!
Sunlight, natural
Sunlight, cold
Sunlight, hot
Flash, natural
Sunlight, natural
Shade, natural
All pictures are three coats of Wine & Roses and one coat of top coat. To clarify, by "natural" I mean that I left my nails alone temperature wise and let the polish settle. The formula of this polish was a bit on the thick side but it was definitely worth it for the final result! The most fascinating part of wearing this thermal polish was watching how it changed...sometimes I would get tips like you see above, other times I would get a more gradient like effect, and often times just a solid color. 

If you're interested in finding a bottle of your own, you can check out the Liquid Sky Lacquer site and snag a bottle of your own! The site is down today, but it should be back up tomorrow and hopefully this guy isn't sold out! What do you guys think of this thermal holo? Thanks for reading!


Friday, June 14, 2013

New Cirque Arcus Collection Holographic Swatches and Review

Hey everyone! Today I have a couple of swatches to show you from Cirque's new Arcus collection. I wish I could show you the entire collection, but sadly, these are the only two that I own. I've been a huge fan of Cirque holographics ever since they released Fashion Street and Never Nude a while back. They're all gorgeous, easy to apply, and opaque in 1-2 coats. These two new additions are no exception!
Cirque Bejeweled. Two coats. All pictures are taken in direct sunlight with the exception of the bottom picture which is in the shade. In the shade this is a pretty bright blue, but in the sun it's a really bright blue. The formula was perfect, and it's a lot more holographic than it looks in these photos!
Cirque Vesuvius. Two coats. First picture is in direct sunlight and the second is in the shade. For those of you who checked on my A England Burne-Jones Dream Collection Swatches, you've see this one before! This is a salmon-leaning red colored holographic. For some reason my camera was capturing this one a little more pink than it actually is, but these pictures are pretty close! The formula was fantastic.

If you'd like to check out some of the new Cirque colors, you can find them on Cirque's website. These retail for $16 each (non-holographic shades are $13). Thanks for reading!

Wednesday, June 12, 2013

KKCenter HK Nail Foil Review

Hey everyone! Today I've got a really cool product to show you from KKCenter HK! For those of you who aren't familiar with nail foils, they're small thin sheets of foil that transfer onto your nails. To begin the transfer, you apply one coat of glue (you can buy the glue along with the foil) to your nails. Once the glue changes from a white to transparent shade, you then press the foil directly onto the nail. Push down on the foil to get it sealed on the nails, and then peel off the remaining paper! I know that these are often used for a sort of patchy foil look, but I wanted to try applying mine to the entire nail. I found that the best way to get full coverage was to do two layers of foil transfer, one right on top of the other.
 
This is N.Nail Shiny Silver Nail Foil Transfer. You can find this specific shade here, but it's currently sold out. There are a ton of other really fantastic nail foil transfer patterns you can check out though. I wish these pictures did the manicure justice, but it is so much more awesome looking in person. It looks like I have holographic silver foil on my nails, which is definitely pretty awesome and unique looking. Application is super easy too once you get the hang of it. I highly recommend these, they're a really fun and unique way to do some nail art!

One pack retails for $7.69 (you get a lot of foil, I doubt you'll run out) or there's a bundle that comes with the glue for $12.00. I wish I had a coupon code for you, but KK Center HK hasn't responded to my e-mails asking for mine. I know there are plenty of other coupon codes for 10% off on other blogger's sites though. I'll be sure to add mine the sidebar of the blog if/when I get it. Thanks for reading!

 *These were sent for review. To see my disclosure policy, please click here.

Monday, June 10, 2013

A England Burne-Jones Dream Collection Swatches and Review

Hey everyone! Now that I'm done with both challenges, I've got a lot more opportunities for swatches and nail art reviews. Today I've got A England's newest collection to show you! These four polishes are all holographic and I could rant and rave about how beautiful they are, but I'll let the pictures do the talking. All swatches are done with one coat of base and top coat, pictures are taken in direct sunlight.
A England Sleeping Palace. One coat. I'll start with my favorite of the four. Sleeping Palace is a dark plum holographic. Of the four, this was the most holographic. As you can see, it just glows...it's beautiful. And the formula was perfect.
A England Rosebower. Two coats. This bright red holographic polish was opaque at two coats, but I used two to even things out. Of the four, this had the trickiest formula to work with, but this is A England we're talking about so the formula was still great. Rosebower is also the least holographic of the bunch, though it's more holographic than it looks in these photos.
A England Fated Prince. Two coats. This is the only polish of the four that wasn't opaque at one coat, but it was pretty close! Fated Prince is a charcoal holographic. It reminded me of A England Bridal Veil when I saw it in the bottle, so I thought I'd do a comparison of the two!
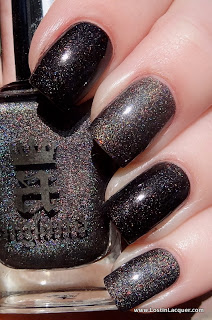
Index and ring finger: Bridal Veil, Middle and pinky: Fated Prince
As you can see, the two aren't even close! Bridal Veil is a lot darker and less holographic than Fated Prince. My pick? Definitely Fated Prince!
A England Briar Rose. Two coats. Briar Rose is a light red holo. Although I used two coats, I could have gotten away with just one if I were more careful! The formula was perfect, in typical A England fashion. This polish looked very similar to one of the new Cirque holos, Vesuvius, so I did another comparison!
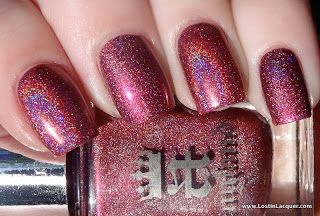
Index and ring finger: Cirque Vesuvius, Middle and pinky: Briar Rose
The base color on Vesuvius and Briar Rose are very similar, however, Vesuvius is substantially more holographic. These both had a fantastic formula, though Briar Rose is on the thicker side. My pick? Versuvius, because I'm a huge sucker for linear holos!

Phew, that was a bit picture heavy, but I am just in love with this collection and had a hard time choosing just a couple of photos to share! If you live in North America, you can pick up A England polishes at Llarowe or Nail Polish Canada. For those of you in the UK, you can get them on the official A England Site! Thanks for reading!

Sunday, June 9, 2013

New 31 Day Challenge - Day 31 - Recreate Someone Else's Manicure From the Challenge

Where to begin...? I had a 7:20 am flight this morning, and as a nerd who stays up until 5 am playing video games (I wish I was joking...), I figured I may as well stay up the whole night and sleep on the plane. The evening began when I went to my lovely friend Amanda's housewarming party, and it was a blast! I got home at about 1 am and realized that I needed to do a manicure to finish the challenge alongside my challenge mates! At the time, I was still wearing the gradient from my last post and needed to pack. Low on time, I figured I'd just paint over that manicure. Earlier in the day, I had settled on recreating Traci's Silver Ruffian nails. Because I was painting over another manicure, I thought I'd use a dark shade of gray instead of white because it's a lot more opaque. Then I had another genius idea to to use silver glitter instead of a silver foil for the manicure. The clean-up on a glitter ruffian is...not fun, let's put it that way! Since I was using tip guards for the ruffian, for whatever reason I was compelled to use a chevron tip guard as well and had a pinky accent nail. About 20 minutes after this, my boyfriend gets a call that our flight is cancelled. We find out that there's no way we're making it out today, so I head to bed. I wake up in the morning to find the midnight monstrosity I had bestowed upon my nails. I'm just done...
The gray is OPI Nein! Nein! Nein! OK Fine! and the glitter is China Glaze Glittering Snow.

On a more positive note, I am now done with the N31DC! I can't believe it's over already! It's been so wonderful getting to know Jayne, Naomi, and Traci! Thank you girls so much for letting me hop into this challenge, I'll never forget your kindness (and beautiful nails)!


Thanks for reading, and be sure to check out the gorgeous nails of the wonderful ladies participating in this challenge along with me!


Jayne at Cosmetic Proof
Traci at Drink Citra
Naomi at Bellezza Bee

Friday, June 7, 2013

New 31 Day Challenge - Day 30 - Favorite Nail Art Technique

Hey everyone! I'm going to be going out to Princeton, NJ this weekend to try and find a place to live...Wish me luck! That means I won't be posting as much until I get back on Saturday, but I have a few things backlogged that I can show you all.

I couldn't decide between a gradient or stamping for this challenge, but I seem to stamp a lot more than I gradient so I'm going to mix it up a bit. (Hardly at all though, since I do both pretty frequently...) I was inspired by someone on Reddit Laqueristas who posted a multichrome gradient. I thought it was an awesome idea!
These are all pictures of the same gradient. Pretty cool multichrome effect, right? I used Enchanted Polish Hey Jude for the base of this manicure. Hey Jude is a green, pink, and I wanna say almost a nudish color multichrome holo. It's hard to see pink in these pictures but it's definitely there in person. The color on the tips is Enchanted Polish Across the Universe, which is a blue, purple, and pink multichrome holo. I used the make-up sponge gradient technique for these, but it was really difficult due to the sheerness of these two polishes.

Thanks for reading, and be sure to check out the gorgeous nails of the wonderful ladies participating in this challenge along with me!


Jayne at Cosmetic Proof
Traci at Drink Citra
Naomi at Bellezza Bee