Edit: Enter to win a matching Legend of Zelda fleece hat here!
Hey everyone, how's your week going so far? Today I'm going to take a break from the 31 Day Challenge to post my first tutorial! I apologize ahead of time for any poor photography or instructions, I'm new to this. I'd like to note that my friend Chelsea is serving as the hand model for this tutorial, so a big thanks to her for waiting patiently as I took photos along the way!
This a tutorial for the Legend of Zelda nails pictured above. This tutorial can also be applied to any other homemade nail decals you wish to make, such as the one used in my
Downton Abbey manicure. To do this, you will need the following:
White nail polish (I used OPI My Boyfriend Scales Walls, but any white should work fine.)
Transfer Film, I used Grafix Rub-Onz Transfer Film which can be found in some stores (there's a store finder on their website) or you can order them off Amazon.
Color Printer
Scissors
Cuticle nippers
Coin or Popsicle stick
Top coat
To start, paint your nails white. Wait for them to dry completely.
The Grafix Rub-Onz Transfer Film comes with two different sheets of paper. On the left is the transfer film, which is more transparent than the adhesive film shown on the right. You'll want to print on the transfer film, so put the adhesive film aside for now.
Copy this image into a Word or other word processing document. Next, you'll want to adjust the size of the image so it will actually fit on your nail. If you're using Microsoft Word, you can right click and then select "Size and Position" and adjust the pictures dimensions to a height of 0.53" and a width of 0.67". Note that these are the dimensions I used for my nails and this tutorial, however, you may need a larger size if your nails are longer. I suggest experimenting on regular printer paper to find the right size for you, although the dimensions I used will work for most people.

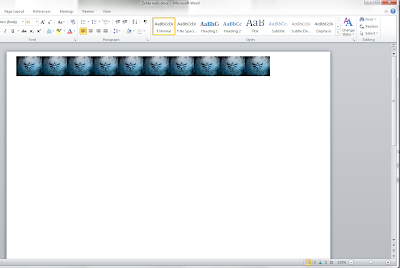
Copy the image until you get ten copies. Be sure to remove margins from your document so that the designs print in the corner and you don't waste as much transfer film. Here's what mine looked like when it was ready to print. Adjust your printer settings so that it's set to print high quality and on photo paper. The transfer film has two sides, one that is shiny and one that is matte. It's difficult to see, but if you check carefully you can see the contrast between the two. Be sure to print on the matte side of the paper. If you accidentally print on the wrong side, worry not, the ink will come right off!
If you've printed on the right side, this is what your transfer film should look like.
Now grab your scissors and cut out the strip of the transfer film that contains the design.
Take the adhesive film you put aside earlier and cut out a piece that is slightly larger than the cut out design strip from the previous step. I placed my design cut out on top of the adhesive film to make sure I cut a larger piece.
At this point, you should have two cut outs, one with the designs and a larger one from the adhesive film.
Take the adhesive film strip, and peel the two layers of the paper completely apart. There should be a clear sticky part and a non-sticky white paper part. Sandwich your design between these two layers of the adhesive film strip, placing the clear layer on top and the paper layer on bottom.
Your "decal sandwich" should look something like this.
Take a coin and rub it along the decal sandwich to get rid of any air bubbles. Don't worry if the white paper on the back falls off at this point, as it is no longer necessary.
Once you've gotten the air bubbles out, cut out your decals completely into their ten individual squares. If the white part on the very back hasn't fallen off yet, remove it now to avoid confusion on the next step.
You should have ten of these squares now, one for each nail. This next part can be a little tricky. You'll need to peel off the top clear layer from the square. Be sure not to peel off the more opaque layer on the back, or your decals won't be sticky!
Now, apply the decal to your finger nail. As long as you don't push down on it, you should be able to readjust the position of the decal. Once you have it in the desired position, press down on the decal to lay it flat on the nail. Once it's suck to the nail, peel off the back layer.
Now you should have the design on your nail, as well as a bunch of places around your skin that you don't want it. Boo.
I carefully used cuticle nippers to cut off the parts of the decal that were on the skin/cuticles. Be very careful when you do this, don't tear your cuticles apart! If you're having a hard time with this method, I found that simply using my finger nail to peel off the part I didn't want and using the nippers to just trim off the little bits that remained worked as well.
After you've removed most of the unwanted decal, use a brush dipped in acetone (similar to the way you would normally clean up the cuticle area) to remove the tiny unwanted bits that may still remain.
Once you're satisfied with the shape of the decal, apply a generous amount of top coat. For Chelsea's nails, I only needed one coat of top coat because her smaller nails led to less wrinkling during application. For the nails pictured at the beginning of the post, however, I had to use about three to get it looking smooth.
Yay! Zelda nail! Now repeat this process for the rest of your nails and you'll have your own Legend of Zelda manicure!
Please let me know if any parts of the tutorial are unclear, and I'll do my best to elaborate! Thanks a lot for reading, let me know if you have any success with this method.


What a great tutorial! Thanks for the tip about not tearing your cuticles apart! I will definitely keep that in mind.
ReplyDeleteThanks! I would be sad if I was responsible for someone's torn cuticles. :(
DeleteAshjsdfkhfsd thank you so much for this! I will definitely be buying some transfer paper to make some home-decals. You're the best! x
ReplyDeleteYou're welcome! I'm looking forward to seeing what you come up with. ^^
DeleteWow! Mind if I reblog this? with credit to you of course :)
ReplyDeleteBy all means!
DeleteAwesome tutorial!! I love how it looks!!!
ReplyDeleteThanks! I love doing this :D
Delete